How to Manage Projects in Skapp: A Complete Project Management Guide
TL;DR
Skapp’s Project Management module helps teams plan work, manage tasks, collaborate with internal and external stakeholders, track time, and organize releases in one place. Teams can create projects, customize workflows, assign tasks, log time directly within items, invite guest collaborators, and track delivery through releases. With features like custom workflows, task labels, time tracking, and release management, Skapp provides a structured yet flexible way for teams to manage projects from planning to delivery.
Managing projects effectively requires more than just tracking tasks. Teams need visibility into progress, clear ownership of work, structured workflows, and a way to collaborate without jumping between multiple tools. When projects are managed across spreadsheets, chat threads, and disconnected platforms, it becomes harder to stay aligned and deliver work efficiently.
Skapp’s Project Management module provides a structured yet flexible environment where teams can plan, organize, and execute work in one place. From creating projects and defining workflows to managing tasks, tracking time, and coordinating releases, Skapp brings the entire project lifecycle into a single workspace.
Whether you're managing internal initiatives, client deliverables, or product development cycles, Skapp helps teams stay organized while maintaining clarity across projects.
In this guide, we’ll walk through how to use Skapp’s Project Management module, including how to:
Create and set up projects
Customize workflows with statuses and labels
Create and manage tasks
Track time directly within work items
Collaborate with guest users
Manage releases and track delivery progress
Import existing projects from Jira
By the end of this walkthrough, you’ll understand how to structure and manage projects in Skapp from planning through to delivery.
Getting started with your first project
Setting up a project in Skapp is straightforward and only takes a few steps.
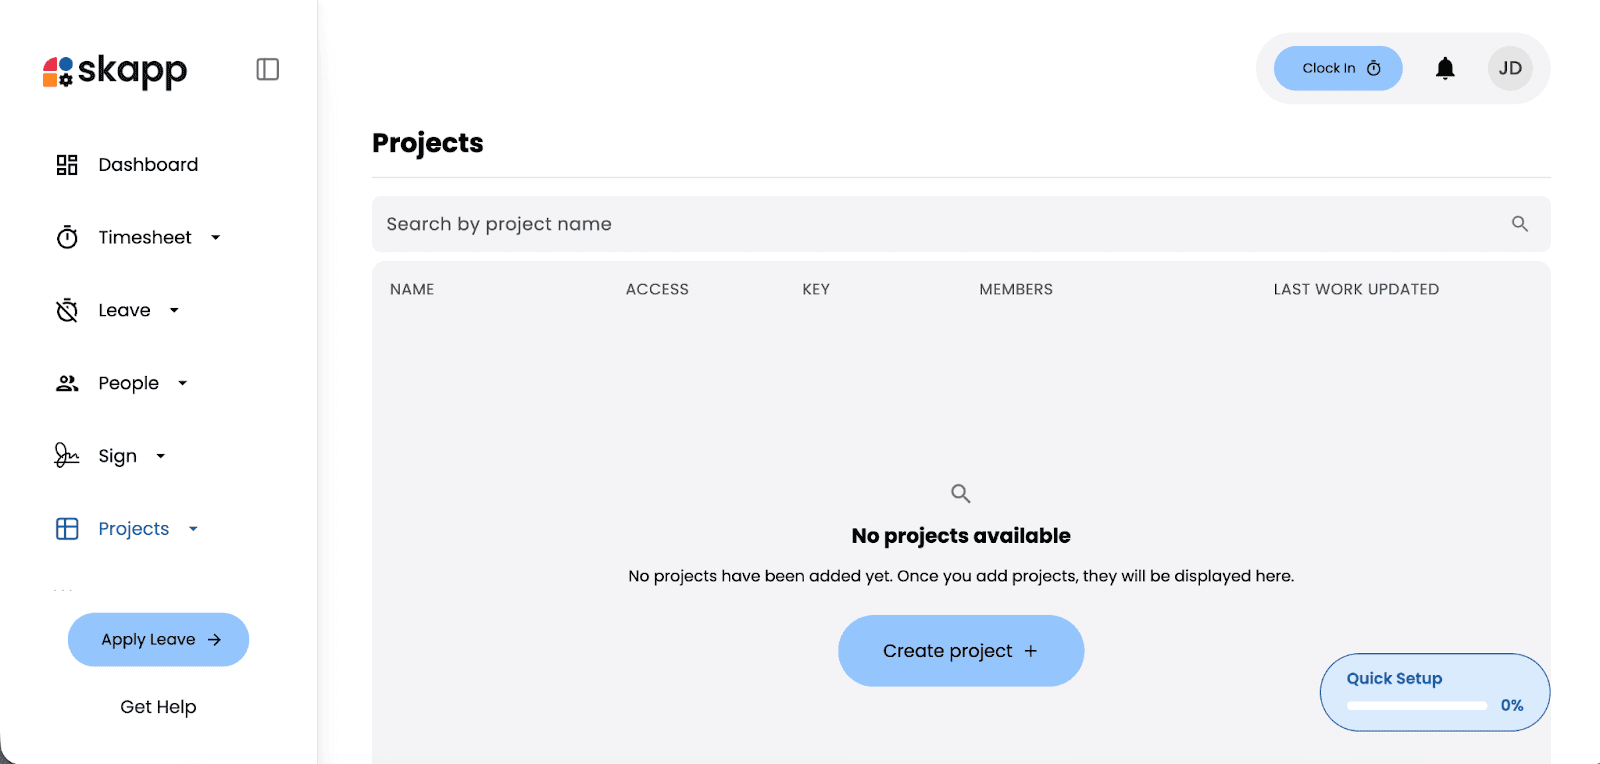
Step 1: Navigate to the Projects module
From the main dashboard, click on Projects in the left-hand navigation menu. If no projects have been created yet, you’ll see a message indicating that no projects are available, along with a Create Project button. Click Create Project to begin.
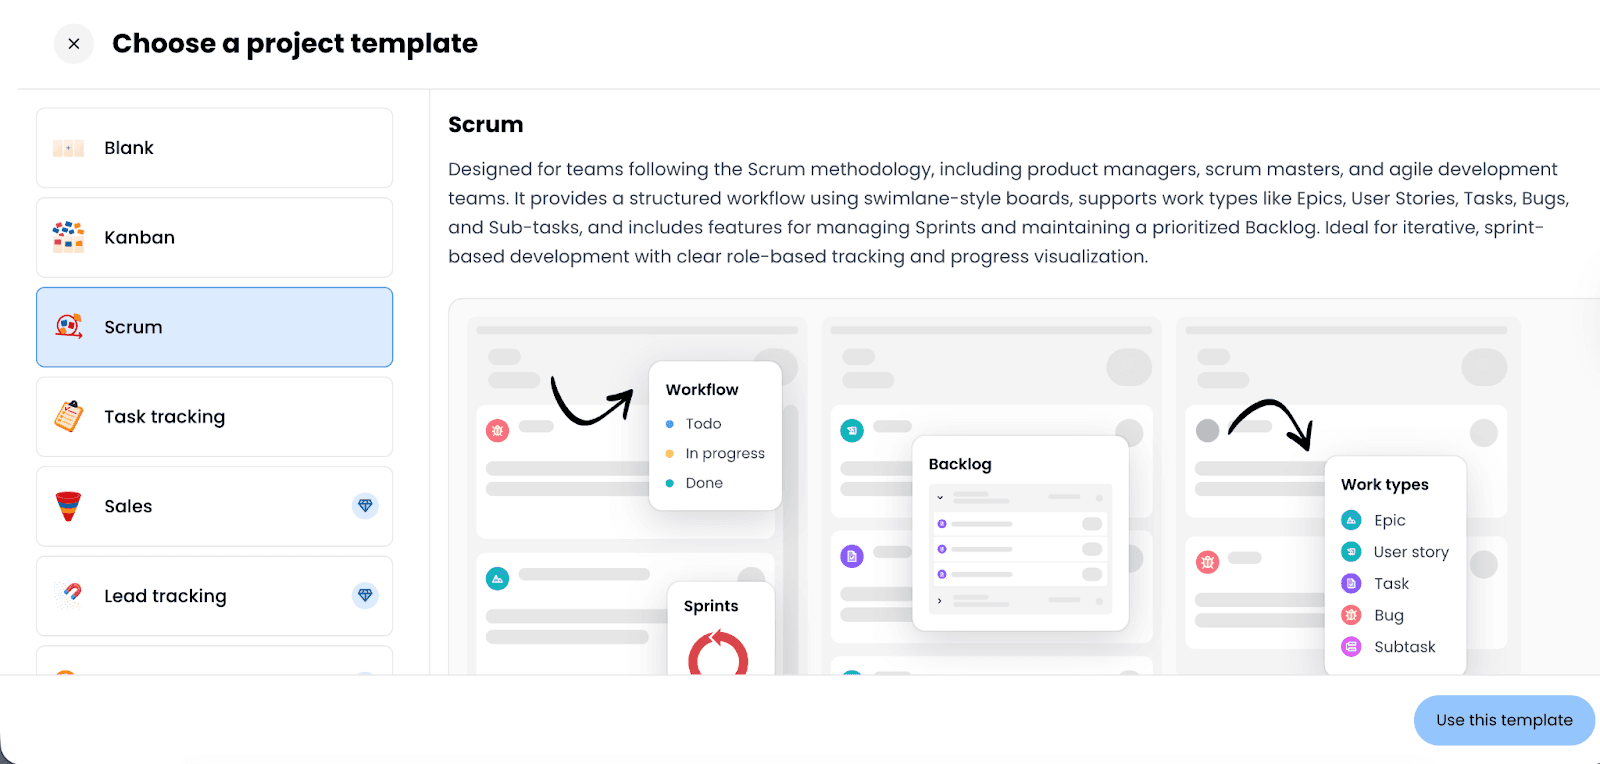
Step 2: Choose a project template
On the right side of the project creation screen, you can select a template. For example, the Scrum template is tailored for agile teams managing iterative work through sprints and backlogs.
Templates provide predefined structures, workflows, and views that help teams get started quickly. If none of the templates match your needs, you can create one from scratch.
Step 3: Enter project details
You’ll be prompted to enter the basic details for your new project.
This includes:
Project Name – The name that will identify your project.
Project Key – A short unique identifier used within the workspace.
Access Type – Choose whether the project should be:
Open – Accessible to all workspace members.
Private – Accessible only to assigned users. (Core Tier feature)
Choosing the appropriate access level ensures that sensitive work remains controlled while collaborative projects remain visible.
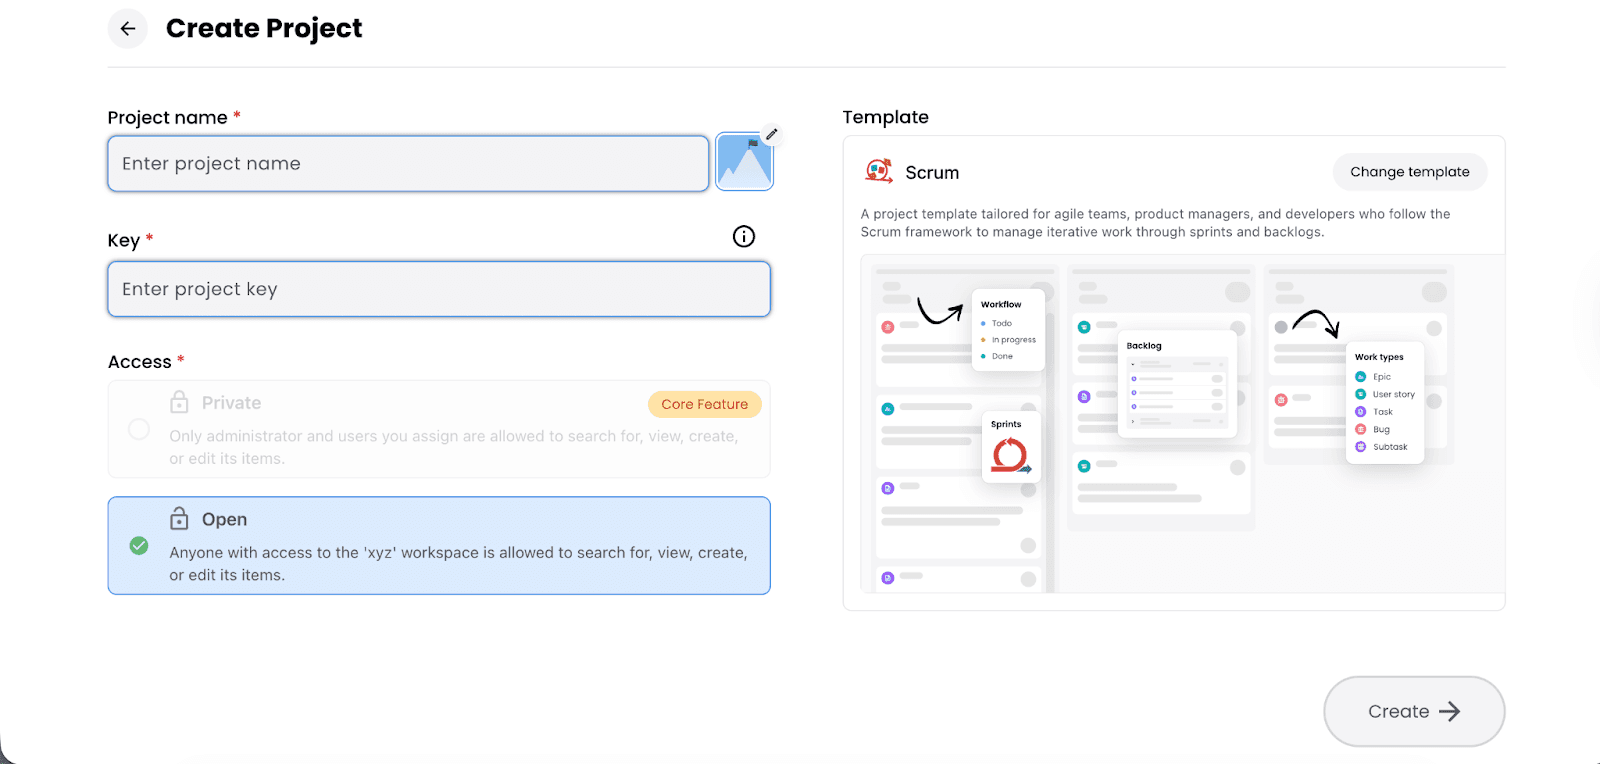
Step 4: Create the project
Once all required fields are completed, click Create. Your project workspace will be generated instantly, ready for tasks, boards, and collaboration.
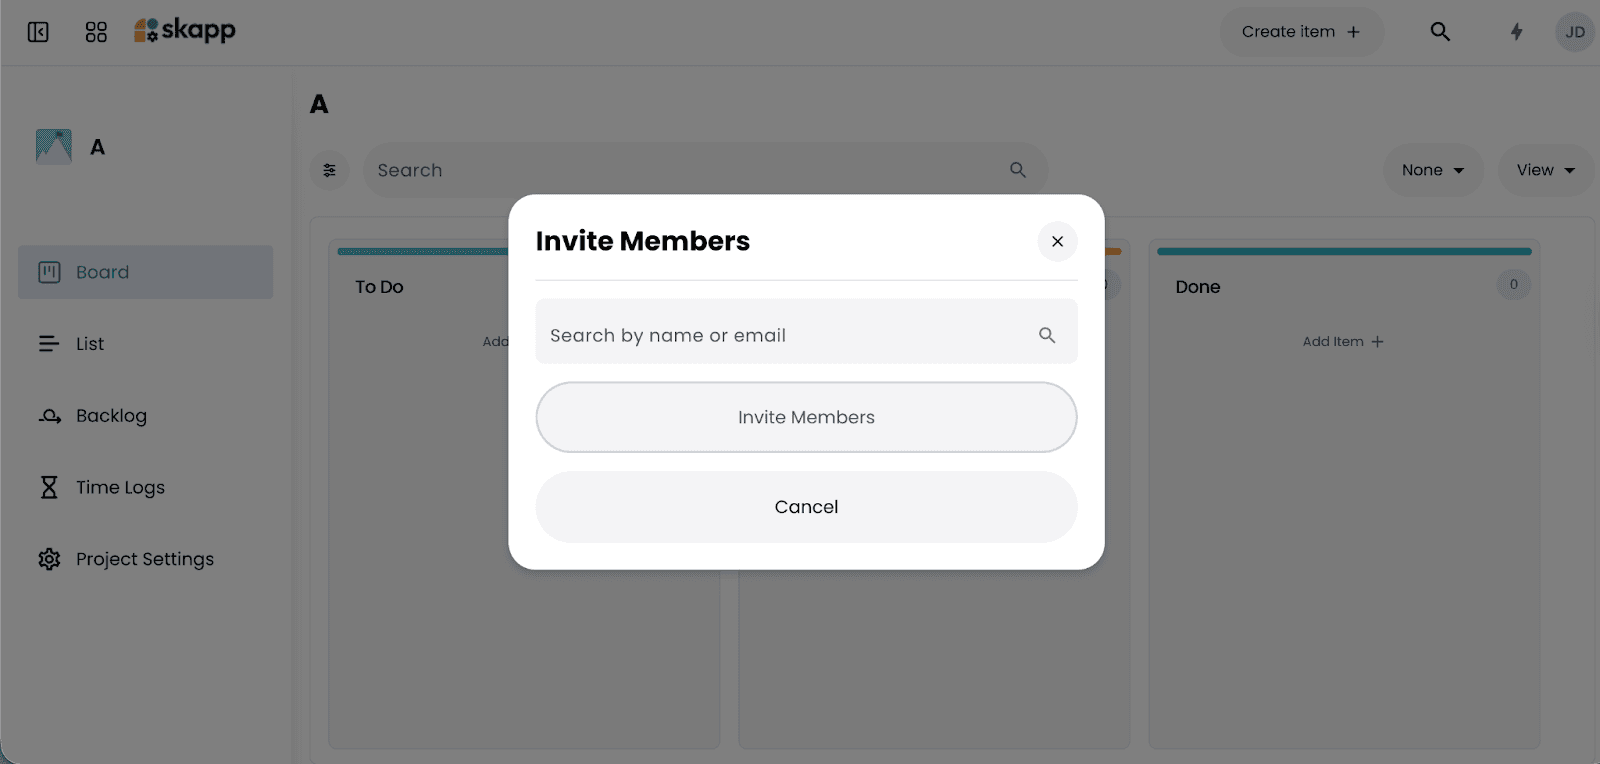
Step 5: Invite members to the project
After creating the project, you can invite team members. Click Invite Members, search for users by name or email, and add them to the project. Inviting only relevant members ensures the right people have access while maintaining workspace clarity.
Customising your project structure
Once your project is created, you can tailor how work flows through it. Skapp allows you to configure both task statuses and labels to match your team’s workflow. Customising your structure ensures that tasks move clearly from start to finish while remaining easy to track.
Managing columns and statuses
To modify how tasks move through your project:
Open your project → Navigate to Project Settings → Click on Columns & Statuses.
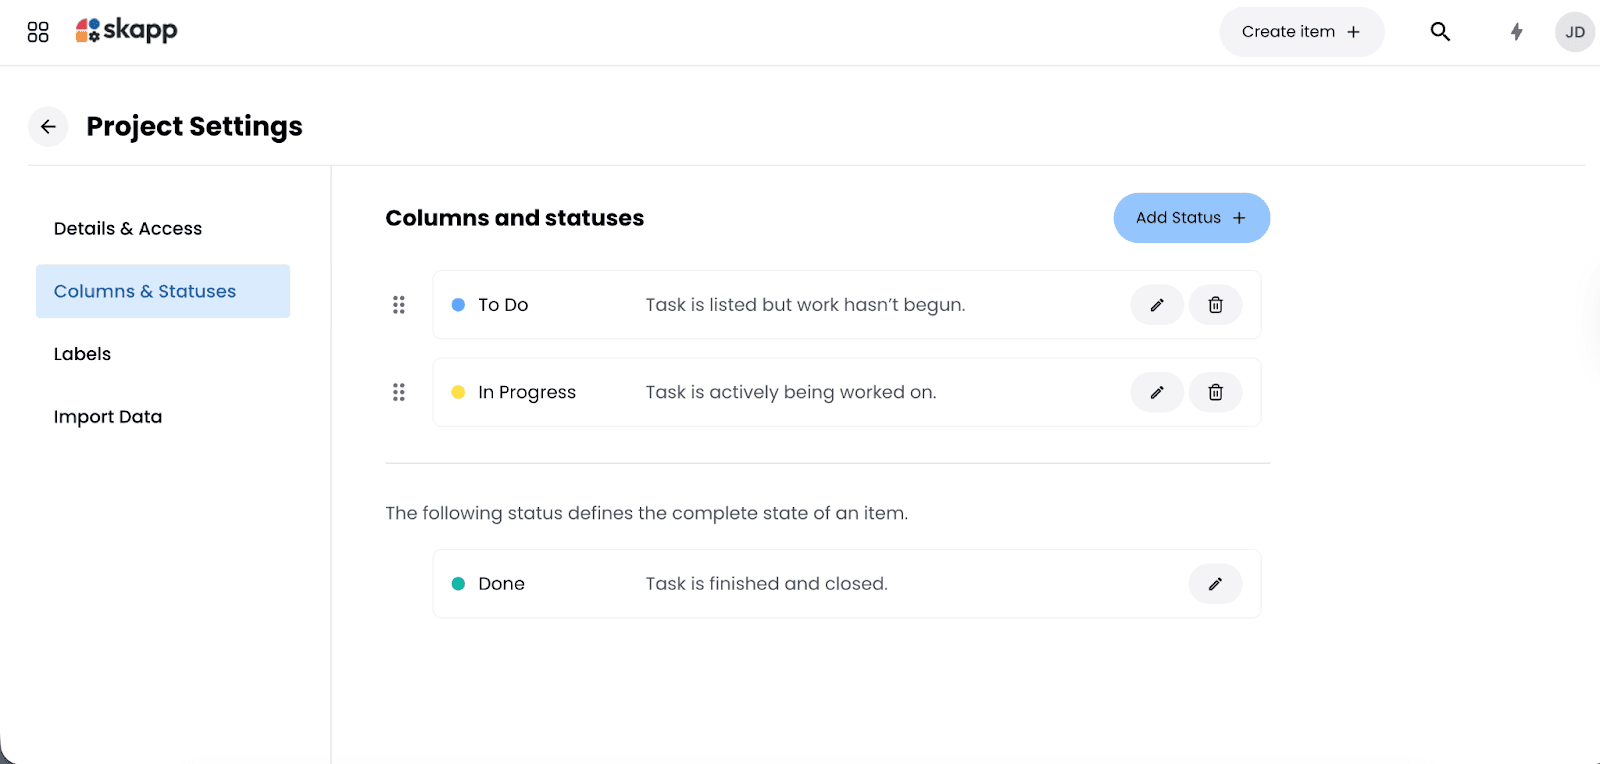
Here, you’ll see the default workflow stages, such as:
To Do – Task is listed but work hasn’t begun.
In Progress – Task is actively being worked on.
Done – Task is finished and closed.
You can:
Edit existing statuses
Reorder them
Add new statuses using the Add Status button
This allows you to create a workflow that reflects how your team actually works. For example, you may want to introduce stages like “Review,” “Blocked,” or “Testing.” While flexibility is helpful, it’s best to keep your workflow simple. Too many statuses can create confusion instead of clarity.
Adding and managing labels
Labels help categorize and visually organise tasks.
To create labels:
Open Project Settings → Click on Labels → Select Add → Enter a name for the label → Choose a color → Click Save
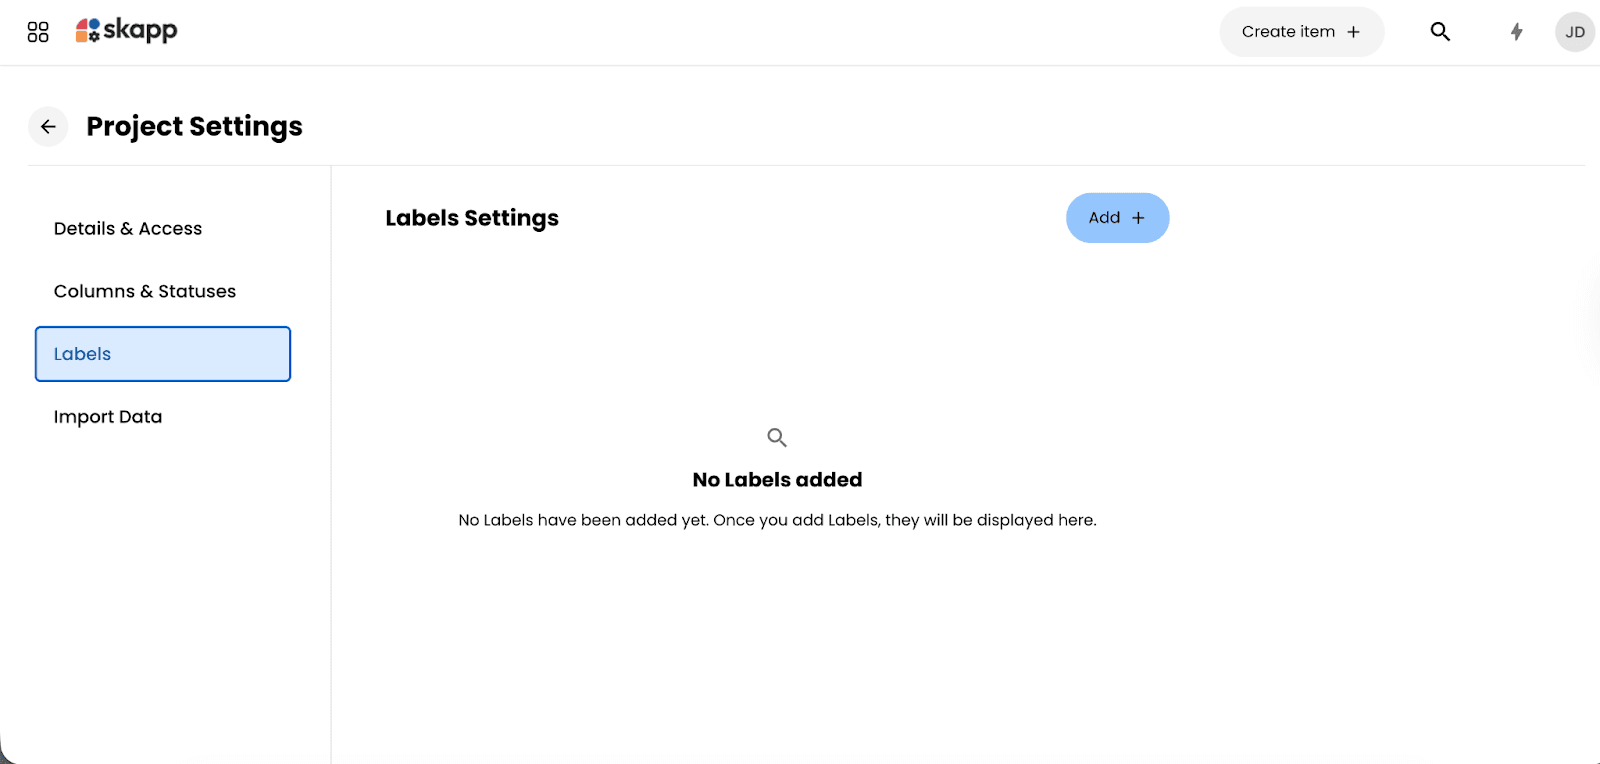
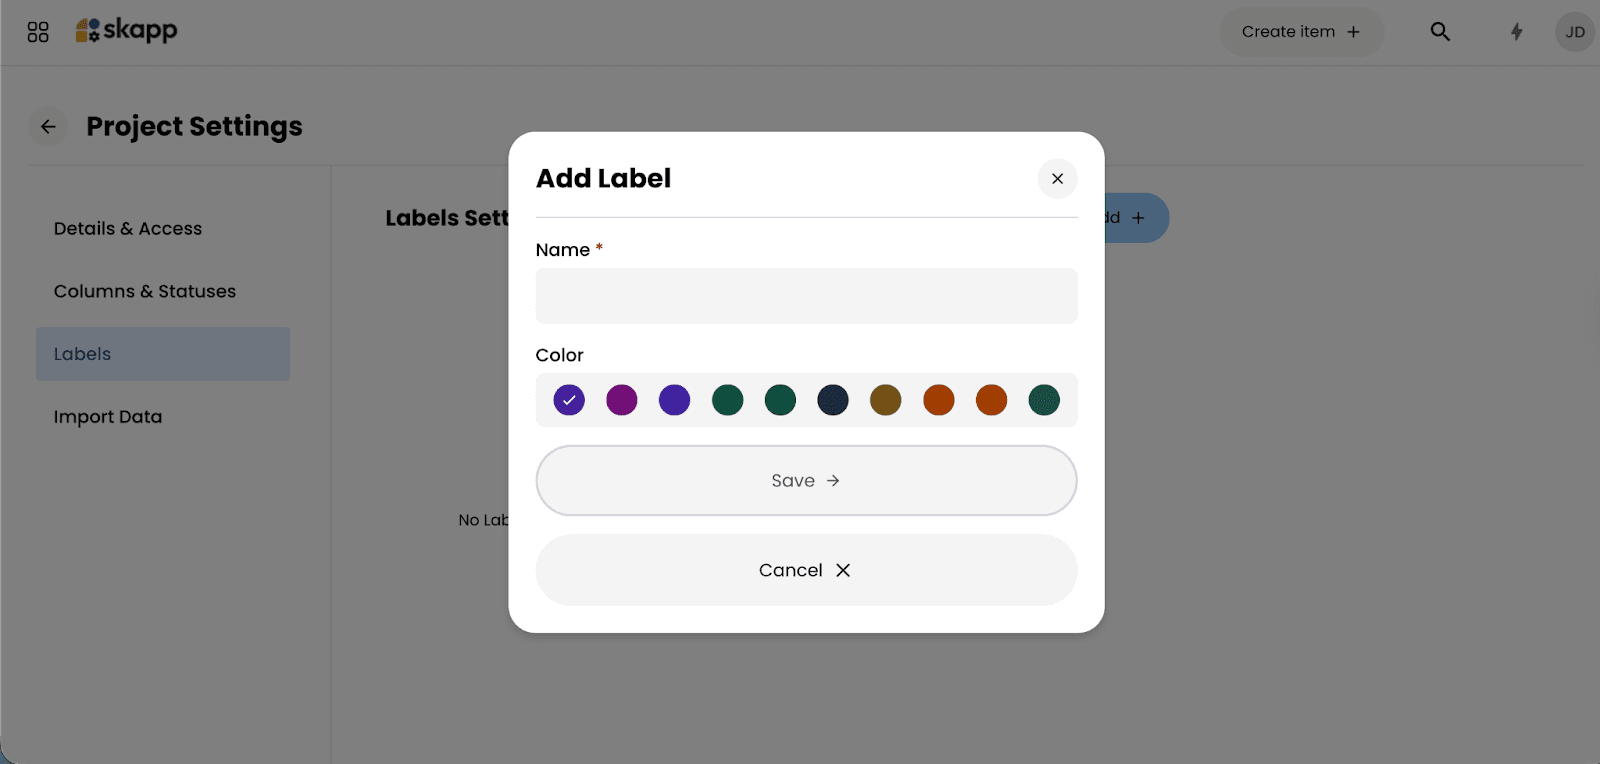
Labels can represent:
Priority levels
Task types
Departments
Client names
Internal classifications
Once created, labels can be applied to tasks to improve filtering and reporting. Color-coded labels make it easier to scan boards and quickly identify patterns across your project.
Custom fields, statuses, and labels are powerful tools - but they should serve a purpose.
The goal of customization in Skapp is to improve visibility and organization, not to add unnecessary overhead. Start with the basics, and expand only when your workflow truly requires it. A clear, well-defined structure helps teams stay aligned without slowing down daily work.
Creating and managing tasks
Once your project is set up, the next step is adding work items. In Skapp, tasks are created as items within a project. These items can represent stories, tasks, bugs, or other work types depending on your workflow.
To create a new item:
Open your project → Click Create item → Fill in the required details.
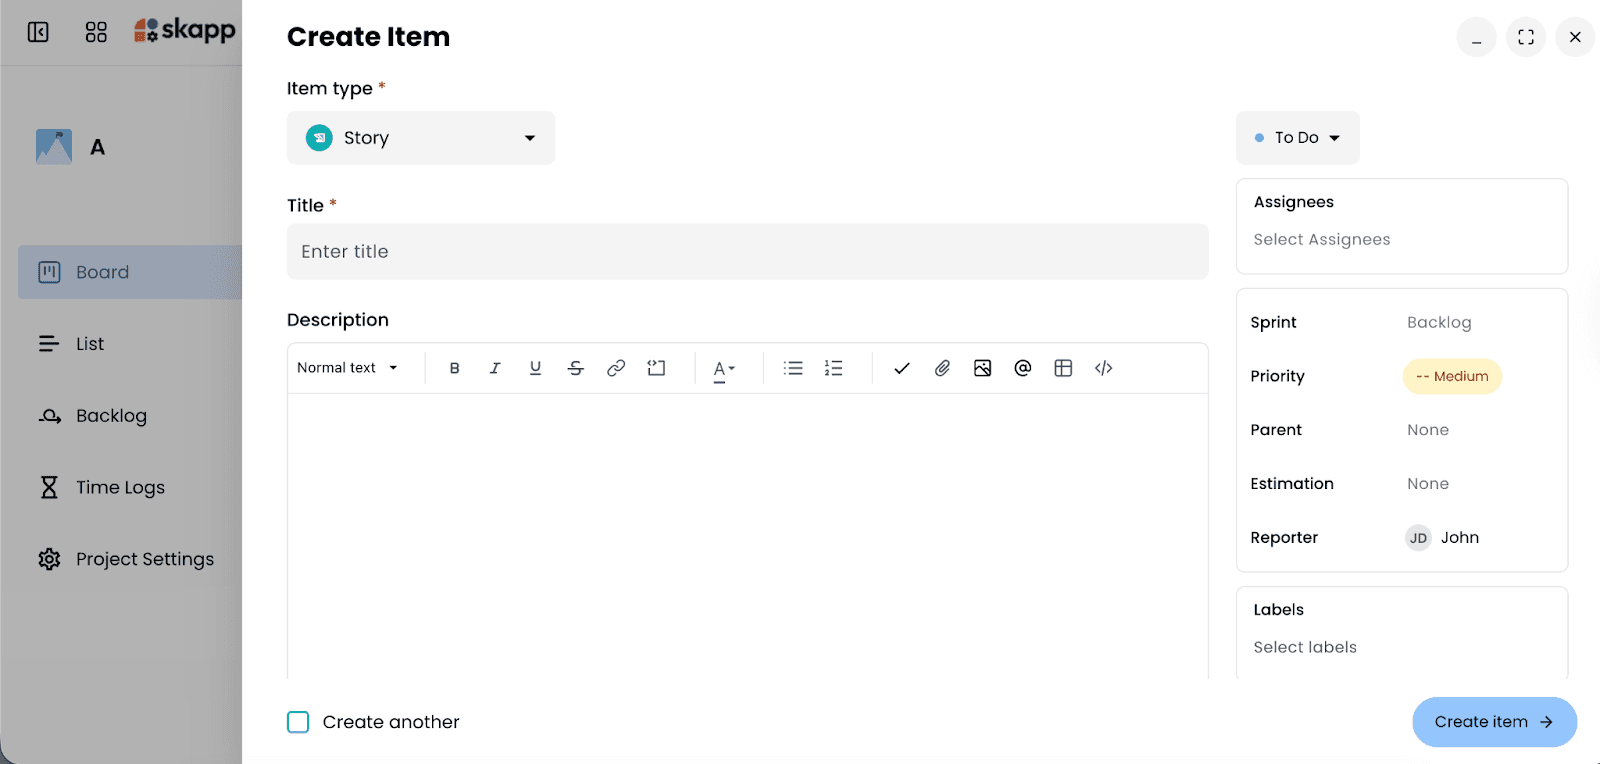
Defining the item type
When creating an item, you can select the Item Type.
For example:
Story
Task
Bug
Or other custom types, depending on your project template
Choosing the correct item type helps maintain structure and keeps your workflow organized.
Adding a title and description
Each item requires a Title, which should clearly describe the work to be completed. You can also add a detailed Description to:
Clarify requirements
Add links
Include attachments
Embed additional context
Providing sufficient detail reduces confusion and improves execution.
Assigning ownership
On the right-hand side of the item view, you can assign:
Assignees - The person responsible for completing the work
Reporter - The person to whom the assignee should report regarding the task
Clear ownership ensures accountability and prevents tasks from being overlooked.
Setting sprint, priority, and relationships
Depending on your template, you can also configure:
Sprint - Associate the item with a sprint or backlog
Priority - Indicate urgency (e.g., Medium, High)
Parent - Link to a larger task or epic
Estimation - Add effort/ time estimates if required
These fields provide additional structure for teams that need more detailed tracking.
Applying labels
If you’ve configured labels in Project Settings, you can apply them directly within the item.
Labels make it easier to:
Categorize work
Filter tasks
Identify patterns across the board
They are especially useful when managing larger projects with multiple work streams.
Creating and continuing
Once all required fields are completed, click Create item. If you need to add multiple tasks at once, you can select Create another before saving to streamline the process.
Keeping tasks aligned with workflow
After creation, items move through the workflow stages you defined earlier (such as To Do, In Progress, and Done).
As work progresses, team members can:
Update statuses
Add comments
Log time
Attach files
This keeps everything tied to the task itself, ensuring clarity from start to completion.
Managing Releases
For teams that deliver work in versions, milestones, or product updates, Skapp includes a Releases feature that helps organize work around specific delivery cycles.
Note: The Releases feature is only available in the Skapp Core tier plan.
Releases allow teams to group related work items under a specific version, making it easier to track progress toward delivery and communicate updates clearly.
To access releases:
Open your project → Navigate to Releases in the project sidebar.
The Releases page provides a centralized view of all project versions. You can toggle between Released and Unreleased versions to track both upcoming and completed releases.
Each release displays key information such as:
Version name
Release date
Environment (Development, QA, Production, etc.)
Progress based on associated work items
Summary describing the release
This overview helps teams quickly understand what is scheduled, what is in progress, and what has already been delivered.
Creating a new release
To create a new release, click Create version in the top-right corner of the Releases page.
You will then be prompted to enter the following details:
Name – The version name for the release
Start date – When work on the release begins
Release date – The planned delivery date
Environment – The stage where the release applies (such as Development, QA, or Production)
Driver – The person responsible for overseeing the release
Summary – A brief description of what the release includes
Once the details are completed, click Create to add the version to your project.
Tracking release progress
As work items are associated with a release, Skapp automatically tracks progress by showing how many items have been completed versus the total included in that version.
This makes it easy to monitor whether a release is on track and identify outstanding work before the release date.
Generating release notes automatically
Skapp can also generate release notes automatically based on completed items associated with the release. Instead of manually compiling updates, teams can quickly produce structured release summaries that reflect the actual work delivered.
This helps teams keep stakeholders informed while reducing the overhead typically involved in documenting product updates.
By organizing work into releases, Skapp helps teams move from planning to delivery with greater clarity while maintaining visibility across development, QA, and production stages.
Collaborating with guest users
Skapp allows you to collaborate with external partners, clients, or stakeholders by inviting them as Guest Users. This feature is especially useful when working with clients who need visibility into progress, or external contributors who need limited access to specific projects.
To invite a guest user:
Navigate to Projects in the sidebar → Click on Guest Users → Select Invite Guest User
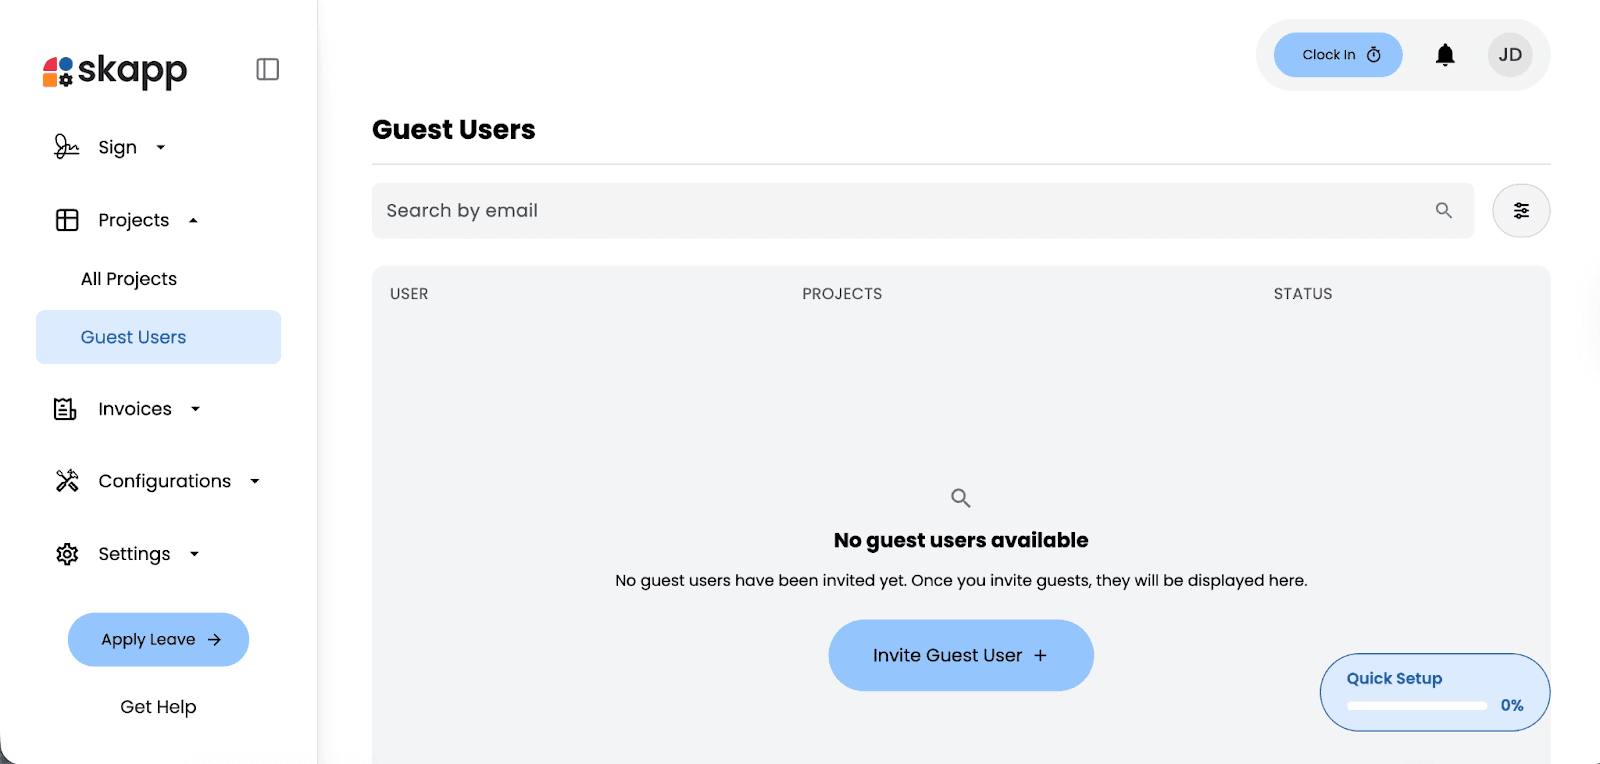
Inviting a guest
When inviting a guest, you can:
Enter their email address → Assign them to specific projects → Control what they can access
Guest users only have visibility into the projects they are explicitly assigned to. They do not gain access to your full workspace, employee data, or other modules. This ensures collaboration remains secure and controlled.
Managing guest access
Once invited, guest users appear in the Guest Users list, where you can:
View which projects they are assigned to
Check their status
Modify access if needed
This centralized view makes it easy to manage external collaborators without losing oversight.
When to use guest users
Guest access is ideal for:
Clients reviewing project progress
External consultants contributing to deliverables
Freelancers working on specific tasks
Partners collaborating on shared initiatives
By keeping collaboration within the project itself, Skapp reduces the need for scattered emails and separate tracking systems.
Guest Users allow teams to extend collaboration beyond internal employees without compromising control. Instead of sharing sensitive data or giving full workspace access, you can keep communication, tasks, and updates contained within the project environment. This keeps work transparent, organized, and secure from start to finish.
Tracking time inside tasks
Skapp allows team members to log time directly within each task, making it easy to track effort exactly where the work happens.
To log time:
Open the relevant task → Locate the Time Tracking section → Click to add time spent.
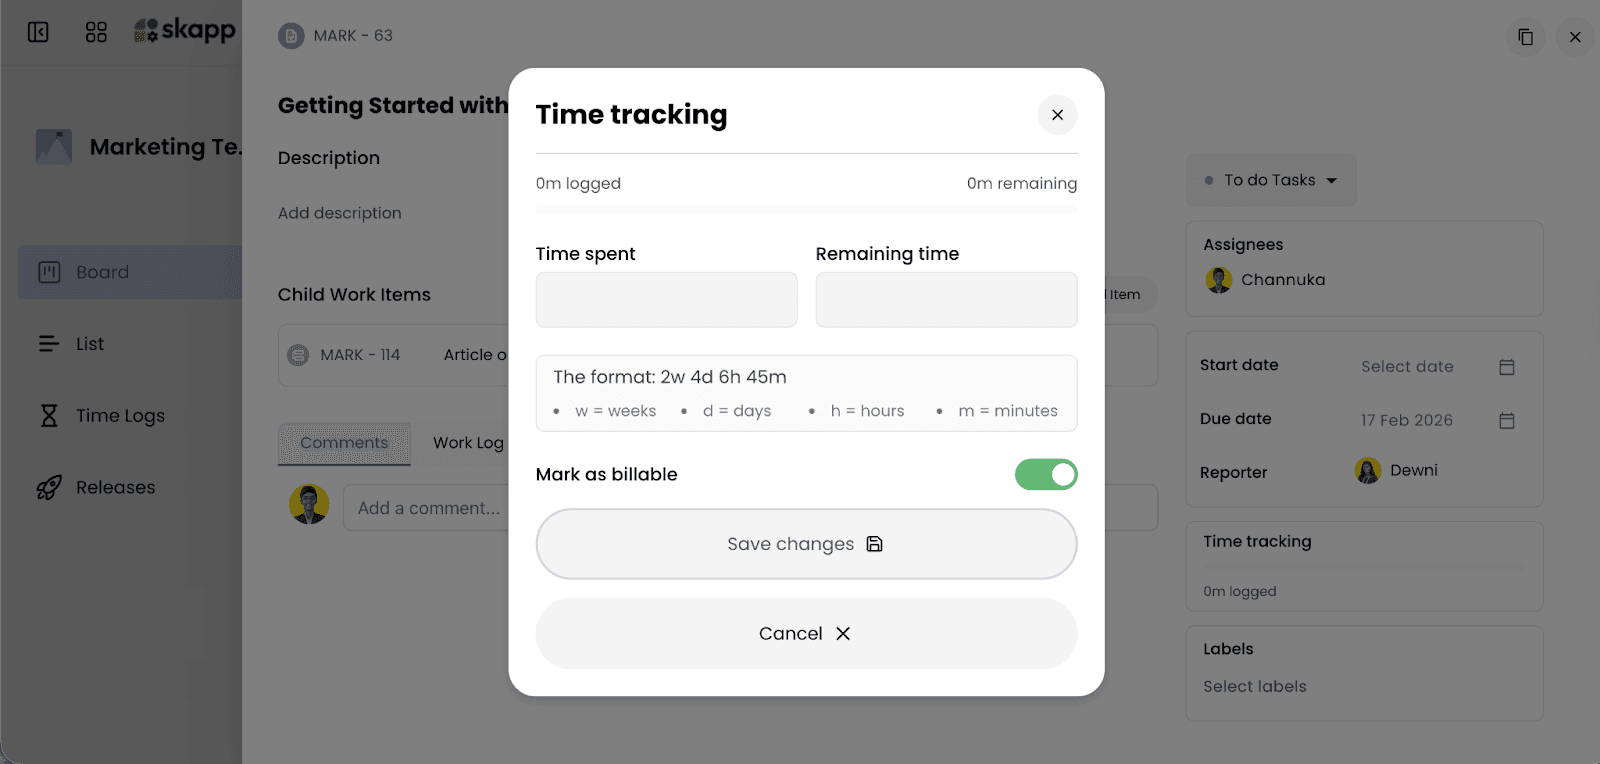
Logging time spent
When you open the time tracking modal, you can enter:
Time spent
Remaining time (optional)
The supported format includes:
w for weeks
d for days
h for hours
m for minutes
For example: 2w 4d 6h 45m
This flexible format allows teams to log work accurately, whether they are tracking small tasks or long-term efforts.
Marking time as billable
If the task is client-related or revenue-generating, you can toggle Mark as billable before saving.
This ensures:
Billable hours are clearly identified
Time data can support invoicing workflows
Reporting remains accurate
Once saved, the logged time is reflected within the task and contributes to overall project visibility.
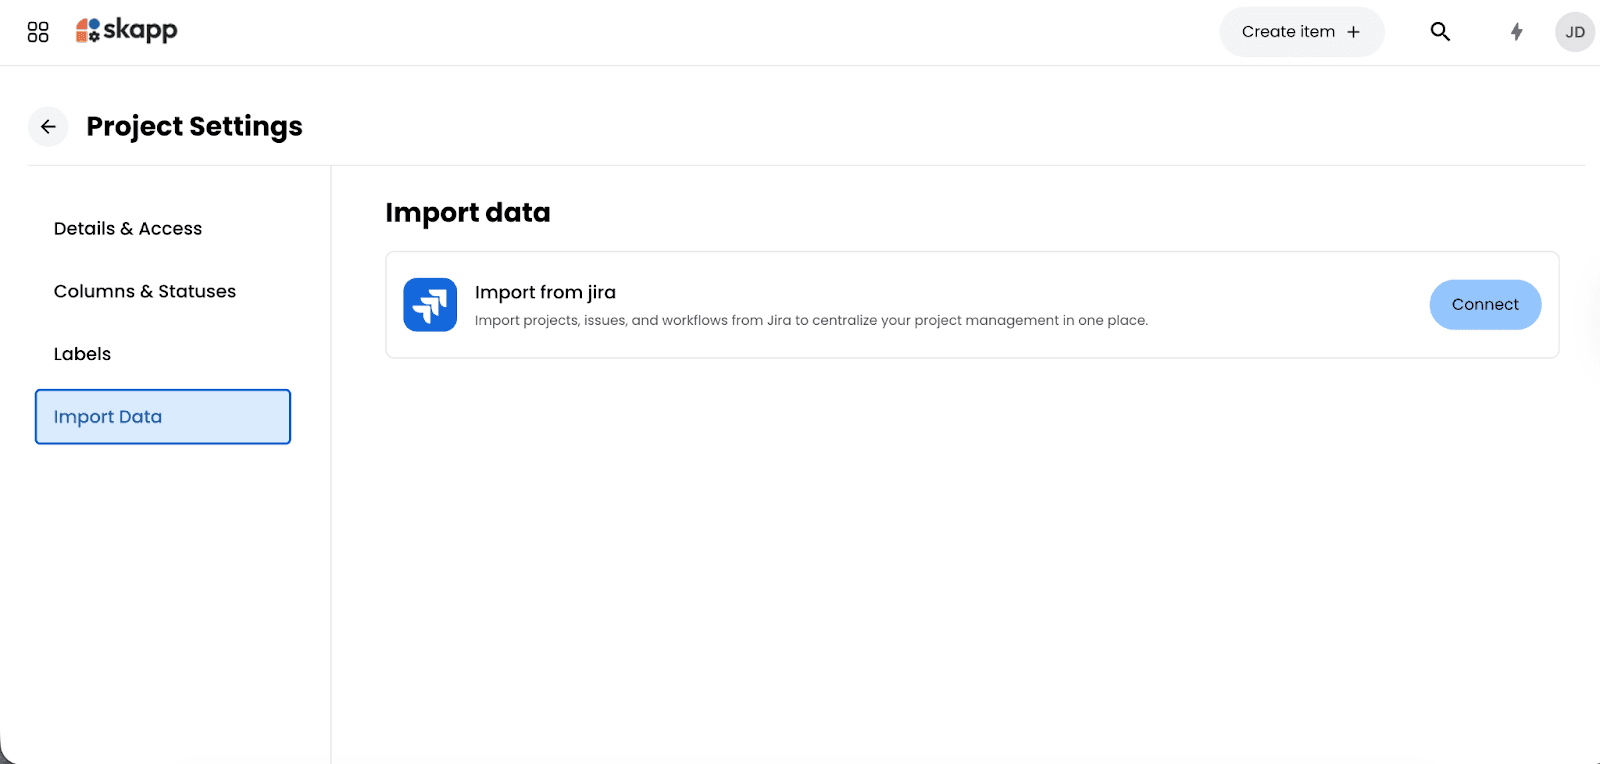
Importing projects from Jira
If your team is transitioning from Jira, Skapp makes migration simple. Instead of manually recreating projects, issues, and workflows, you can import your existing Jira data directly into Skapp.
To access this feature:
Open your project → Navigate to Project Settings in the sidebar → Select Import Data → Click Connect under “Import from Jira”.
Managing Projects Without the Usual Complexity
Project management often becomes complicated when work is spread across multiple tools, communication channels, and tracking systems. Tasks get lost in conversations, progress becomes difficult to monitor, and teams spend more time coordinating work than actually completing it.
Skapp simplifies this by bringing project planning, task management, collaboration, time tracking, and release management into a single module.
Teams can create structured workflows, track progress through clear statuses, collaborate with internal and external stakeholders, and monitor project delivery in real time. By keeping everything connected within the project workspace, Skapp reduces operational friction and helps teams stay aligned on what matters most.
Instead of managing projects through fragmented tools, Skapp provides a unified environment where teams can plan work, execute tasks, and deliver results with clarity.
What is project management software?
Project management software helps teams plan, organize, and track work within projects. It typically includes features such as task management, workflow tracking, collaboration tools, and reporting. Platforms like Skapp centralize these functions so teams can manage projects without relying on multiple disconnected tools.
How do teams track tasks in a project management system?
Teams track tasks by creating work items within a project and moving them through predefined workflow stages such as To Do, In Progress, and Done. In Skapp, tasks can include descriptions, assignees, priorities, labels, attachments, and time logs, ensuring all work-related information remains connected to the task itself.
What are releases in project management?
Releases are structured versions or milestones that group related tasks or features planned for delivery. They help teams track progress toward a product update or project milestone. In Skapp, releases allow teams to organize work by version, monitor progress, and automatically generate release notes.
Can external collaborators access projects in Skapp?
Yes. Skapp allows teams to invite external partners as Guest Users. Guest users can be assigned to specific projects and collaborate on tasks without gaining access to the entire workspace, ensuring collaboration remains secure and controlled.